MODULE 2 ·
RISK FRAMEWORKS

Risk &
Position Sizing

This module turns “don’t risk too much” into a clear, repeatable system. You’ll learn how to decide exactly how much to risk per trade, calculate the correct position size for any coin, and build rules that protect you from blow-ups and emotional revenge trading. When risk is handled, you can focus on execution instead of constantly worrying about losses.

Lesson 2.1

Why Risk Comes First

Most traders start with entries and indicators, then add risk rules later—if ever. Professionals do the opposite. They start from a simple truth: if you blow up your account, nothing else matters. Survival comes before optimisation.

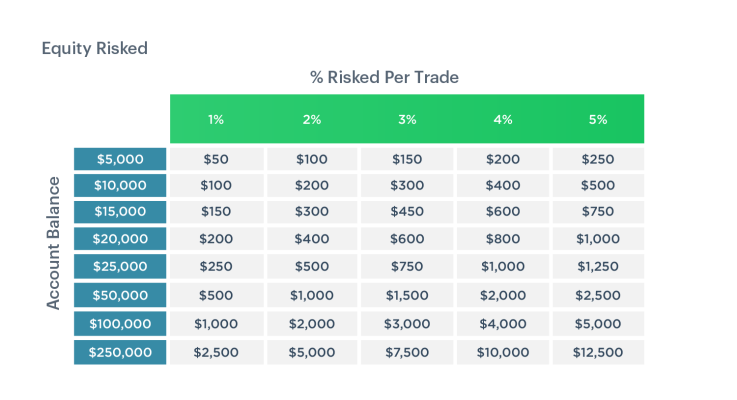
A few large losses can erase dozens of normal wins. Recovering from a 50% drawdown requires a 100% gain. Small, controlled risk acts like insurance that keeps you in the game long enough for your edge to show up.

Lesson 2.2

Defining Account Risk & R-Multiples

Instead of thinking in dollars, it’s more consistent to think in R-multiples—a unit based on risk per trade. If you risk 1% of your account per setup, then a −1R loss is −1%, a +2R win is +2%, and so on. This keeps thinking consistent across different coins and price levels.

A personal risk-per-trade range (for example 0.5–1.5% depending on setup quality) stops random size changes. Increasing risk is earned through performance, not emotion or FOMO.

Equity curve comparison for 1% vs 5% risk per trade
Example of two equity curves: a low-risk approach risking 1% per trade versus an aggressive 5% per trade. The higher-risk curve grows faster when things go well but suffers much deeper drawdowns.
Lesson 2.3

The Position Sizing Formula

Position sizing is where most traders guess. Here you replace guessing with a simple formula that works for any coin or market: Position size = (Account size × % risk) ÷ Stop distance.

Examples using BTC, ETH, and lower-cap alts show how to plug in your own numbers. Before you click Buy, you already know your exact dollar risk, no matter how volatile the chart looks.

Lesson 2.4

Placing Smart Stops

A stop loss shouldn’t be “where it feels safe”. It should be placed beyond a clear structural level where the trade idea is proven wrong. Structure-based stops and volatility-based stops reduce the chances of being wicked out by random noise.

Moves that tap a level and instantly reverse are often liquidity grabs rather than real breaks. Smart stops sit where the market has to genuinely shift character to hit them.

Chart showing entry, invalidation level and structure-based stop placement
Structure-based stop placement: entry, invalidation level, and stop placed beyond a key swing high or low. Price has to truly break structure for the stop to be hit.
Lesson 2.5

Building Your Risk Playbook

A risk playbook is a short set of rules that decides how much you can lose in a day, how many trades you can take, and how you handle correlated positions. It removes heat-of-the-moment decisions and keeps behaviour consistent from week to week.

Define limits like maximum daily loss, maximum number of open trades, and how to adjust size when several setups sit on similar coins. This prevents hidden leverage where one theme going wrong hits the account much harder than expected.

Lesson 2.6

Handling Drawdowns & Tilt

Drawdowns are inevitable. What matters is the response. A simple reset protocol defines when to reduce size, when to pause trading, and what to review before stepping back in at full risk.

Early signs of tilt include impulsive entries, moving stops, and doubling size after a loss. Concrete rules keep those impulses from turning a normal drawdown into a catastrophic one.